Everything (almost) You Wanted to Know About a Willow
Flute,
But Were AFRAID to Ask by Sarah Kirton
The willow flute (sälgflöjt
(Sw.), seljefløyte (Nor.), vidjeflöte (Sw.)
) is one of the oldest instruments, and possibly one of the most
mysterious to the uninitiated. They look like a long pipe with a couple
of holes cut into one end. There are no finger holes. Holding the flute
horizontally as one does the modern transverse flute, the player blows
into one of the holes. Using only air pressure (blowing strength), and
closing and opening the far
end of the pipe with a finger, the player can produce a lively and
complex tune. Very weird.
Willow flute making was traditionally (and
necessarily) reserved for the spring, since they’re made from a willow
branch cut when the sap is rising. After a few days the bark dries out,
and the flute is no longer any good. But since some of us are faced
with long winter evenings, and we are no longer limited to using willow
branches, I thought this might be a good time to learn how to make and
play one — and bring a bit of spring into our winter.
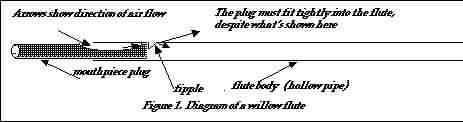
The flute actually is a bit more complicated than
a pipe with a couple of holes. It's a type of fipple flute. There are
some "secret innards" in the pipe. Recorders, many organ pipes, tin
whistles, and police whistles are also fipple flutes, and if you have
one of these, you can experiment a bit with how the fipple works. A
cut-away diagram of a willow flute (Fig. 1) shows the general setup.
The player blows directly into the 1st hole by
covering it with his mouth, not across it like a pop bottle or a
trans-verse (modern silver orchestral) flute. A shaped insert directs
the air stream at the sharp edge of a carefully cut and shaped second
hole. This edge is the fipple. It splits the air stream, creating the
sound. Now we get a bit into physics. (Sigh.) Standing (or unchanging)
wave patterns of vibrating air are set up inside the flute, creating a
tone. The fundamental pitch of this tone is determined by the frequency
of vibration of the longest possible standing wave that can be
generated inside the flute. This in turn is determined by
the length of the flute. In a way, this flute, with no finger holes,
has
only one note. (A second one can be created by closing the end with a
finger
- this shifts the standing wave to produce a lower pitch.) But there's
a
way we can get other notes out of this type of flute.
Any note produced by a musical instrument
has a set of overtones which are produced at the same time. Electronic
gadgets can produce tones with few audible overtones — they're pretty
uninteresting sounding. It's the particular set of overtones an
instrument produces, along with their relative strengths, which gives
it it's timbre, or color. This is why trumpets, flutes, clarinets, and
violins all sound different, in spite of having approximately the same range of notes.
All the other notes produced by the willow flute
are made by varying the strength of blowing. This excites (magnifies)
various overtones so that they are louder than the fundamental (the
basic note). You can find a lot more about overtones, and vibrations in
pipes (clarinets, flutes, recorders, trumpets, organ pipes) by
consulting a basic physics book, a physics-of-musical-sound book, or
the Internet. (Try searching on flute, woodwinds and organ
pipe. If you search on organ pipe, exclude cave, park (as
in "national parks,") rock, cactus, and coral! This will
cut the results down to a mere couple of thousand or so. The organ
pipe sources were pretty interesting.) I've included a few web sites.
Making the flute
Before we examine any more physics,
let's cut to the chase – or the willow tree – as the case may be. To
make a traditional flute, wait till the sap begins to rise in the
spring. Then find a suitable willow twig and twist the bark (as a whole
tube) from the core wood of the twig. Part of the core is used to make
the mouthpiece. We won't go deeper into that here – instead we'll use
PVC pipe. Get some PVC pipe between
16 and 24 inches long. Its inner diameter should be about 35 times
smaller
than the length, according to one of my sources. (about 0.45'' for a
16"
pipe, and 0.67" for a 24" pipe). Measure and mark about 1.5 inches from
one end of the pipe. With a fine saw or sharp knife – I've used a
moto-tool
– cut straight into the pipe until the depth of the cut is VERY close
to
3/5 of the total diameter of the tube. Then, mark a 45° angle from
the
bottom of the cut, toward the far end of the tube. Using this mark as a
guide, make a 45° cut down to the base of the first cut, removing a
notch
from the tube. This slanted cut is the fipple. (See Fig. 1.) Be careful
to make these cuts accurately. The 45° bit seems to be important.
If
you've been using a saw or a moto-tool, you might wish to finish with a
good
sharp knife. Make the edge of the 45° cut as smooth as possible,
and
sharp but not knife sharp. One can use sand paper if needed. The flutes
I have from Norwegian PVC pipe are very thin-skinned, while the PVC
pipe
I’ve found here is pretty thick. This makes cutting a good slanted edge
critical, and the thickeness may be part of why I’ve not had good luck
at
getting a fine flute.
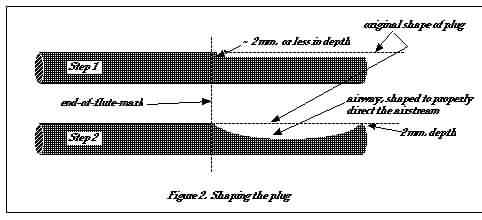
Now it's time to make the mouthpiece plug. Get a wooden rod from a
hardware or hobby store that will fit tightly into the PVC tubing. Or,
for a picturesque touch, find a small branch of the right diameter. You
can leave the bark on or not. If you have to, get something with a
slightly larger diameter, and whittle it down. Cut the rod to between 2
and 3 inches long. If you're going for the natural look, choose a
longer length to show off the natural wood you've found. If the
diameter is too big, whittle enough of one end of it down to fit, so
you can insert it at least up to the vertical cut
into the PVC pipe. Now you need to make an airway in this plug. To make
this next bit easier to understand, look again at Figure 1. When the
plug
is inserted into the flute, you'll blow into the space created between
the
near end of the flute and the airway cut into the plug. The airway will
direct the air at the fipple. The airstream will be split by the edge
of
this cut, and somehow this sets up the standing wave vibration pattern
in
the flute's body.
So here goes. To measure the length of the airway, stick the plug into
the flute just up the edge of the vertical cut. Mark the plug where it
emerges from the end of the flute. Since the airway must extend a bit
past
this mark to give a place for you to blow into, you might want to draw
the
mark almost half way around the plug. (If you just mark the top, the
mark
will be removed as you whittle out the airway.) At the end which will
fit
into the flute, whittle one side of the plug flat, so that when the
plug
is inserted, there's an air space of about 2 mm between the round curve
of
the flute and the flattened upper side of the plug. (See Fig. 2) Now
whittle
out and shape the channel for the air, curving it smoothly down and
back
up again. Leave a VERY small flat space between the end of the plug and
the end of the upward curve of the airway. I suspect that the stronger
your
wood, the less flat space you'll need to leave. You may end up doing
away
with this flat space altogether. At any rate, the upward curve of the
wood
should aim the air at the fipple. You'll need to experiment quite a bit
to get this right. You may also have to exper-iment with exactly how
far
to insert each mouthpiece attempt – it matters a lot.
Since I've managed to make flutes that work, but not any that I like
as much as even the worst ones I've bought, I'd guess you'll need to
experiment a while. I've been told that somewhat hard woods work best,
but after floundering a bit, I bought some balsa wood to experiment
with. When you've got a mouthpiece you like, add a few drops of glue to
keep it securely inserted. Decoration of the flute and mouthpiece are
up to you. One of the flutes I have, made for the tourist trade, is
wrapped with very thin strips of birch bark. The other two have "found"
wooden plugs. One is some kind of conifer with
a very tight bark. The bark has been partially stripped/whittled down
and
smoothed so that a little of the bark texture is left, but doesn't shed
into
one's hand. The other plug has been whittled to show off the wood
grain,
and the end that sticks out is a kind of "knobbly" shape. Very folky
looking. Incidentally – one of these flutes is made from brass tubing.
The other
is of black PVC pipe which is of a fairly large diameter (3/4"). The
far
end, which must be covered securely with a finger to play, has been
heated
to softness and squeezed with pliers so that the opening is oblong
rather
than round. The PVC pipe I've found in the US is a bit thick to do that
with.
I've also tried to make a flute from a hard clear plastic. It is not
only hard, but a bit brittle, so cutting it was some-thing of an
adventure in my ill-equipped kitchen. But it's turned out to be one of
my best attempts. One thing that led me to try it was its narrow bore
(inner diameter) which takes less air. I'd thought of painting it with
some properly delicate
design as befits its transparency. But the moisture from one's breath
steams
it up, eventually creating most unattractive water droplets. I may
paint
the whole thing just to hide this! The interesting thing about the
water
condensation in this flute is that one can see what I assume is
evidence
of the standing wave pattern of the fundamental tone.
This brings us back to the physics of this type of flute, and the scale
associated with it. I'll try to keep the physics to a minimum, but
since it explains the gaps in this flute's unusual scale, I feel I need
to provide a bit of explanation. I hope information about the scale
will help you
play (and listen to) such a flute.
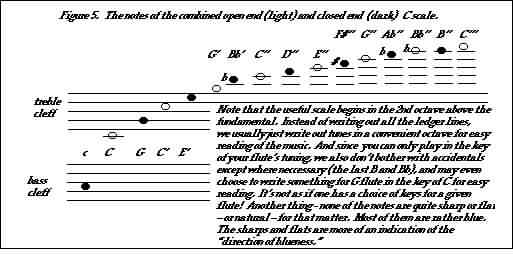
The scale and some physics
The scale produced by the open-ended
flute (i.e., not covering the end with a finger) is the overtone scale,
be-ginning with the fundamental and consisting of the over-tones of
that note. Let's pick a pretty number out of the air – say 100 hertz
(vibrations per second) – for the fundamental frequency. This is a
pretty low note, the "A" of a violin A string is 440 Hz, an octave
below that is 220 Hz, another octave down is 110 Hz – in the bass range
of the human voice. Never mind which exact
piano note 100 Hz. is, the example makes the math involved easier to
get
one's mind around. This is the lowest note of the open-ended scale of
our
imaginary flute. This pitch arises from the shape and length of the
standing
wave created in an open-ended pipe. The next highest harmonic (or 1st
over-tone)
is twice that, 200 Hz. This is an octave above the fundamental tone.
The
2nd overtone is three times the fundamental, 300 Hz. This is an octave
plus
a fifth over the fundamental. The 3rd overtone is four times 100 Hz =
400
Hz, two octaves above the fundamental. This sequence of notes creates a
"scale" of sorts. A second set of harmonics (or "scale") is created by
closing
off the far end of the flute with one's finger. These harmonics arise
from
the set of standing waves created in a closed-ended pipe.
Table 1 shows vibrational frequencies for flutes in three keys,
C, G, and A. Closed note frequencies are in parentheses. Note how
different some of these frequencies are from the values for the modern
even tempered scale, given the left column – even though the
fundamental note of each
flute is equal to the modern value. This is just how the physics of
vibrating
things comes out. Drawings of some of the two sets of standing waves
are
shown in Figures 3 and 4. Figure 5 shows the scale resulting from
combining
these two scales. Note that the same air pres-sure (blowing strength)
will
produce two notes: an open end note, and a closed end note. For a given
air pressure, the closed end note will always be one step down the
"combined"
scale from the open end note.
Table 1 - Frequencies (Hz) of C, G, and A willow flute scales
compared with frequencies of the even-tempered scale
| Note Name |
Equal Tempered |
W. Flute, Key of C
|
W. Flute, Key of G
|
W. Flute, Key of A
|
| C (octave "3") |
130.8 |
(130.8) |
|
|
| G |
195.998 |
|
(196) |
|
| A |
220 |
|
|
(220) |
| C (octave "4") |
261.6 |
261.6 |
|
|
| G (^ that's middle C) |
391.995 |
(392.4 ) |
391.99 |
|
| A (std pitch A) |
440 |
|
|
440 |
| C (octave "5") |
523.3 |
523.2 |
|
|
| D |
587.3 |
|
(588) |
|
| E (vln's top str) |
659.3 |
(654 ) |
|
(660) |
| G |
783.99 |
784.8 |
784 |
|
| A |
880 |
|
|
880 |
| Bb |
932.3 |
(915.6) |
|
|
| B |
987.8 |
|
(980) |
|
| C (octave "6") |
1046.5 |
1046.4 |
|
|
| C#/Db |
1108.7 |
|
|
(1100) |
| D |
1174.7 |
(1177.2) |
1176 |
|
| E |
1318.5 |
1308 |
|
1320 |
| F |
1396.9 |
|
(1372) |
|
| F#/Gb |
1479.98 |
(1438.8) |
|
|
| G |
1567.98 |
1569.6
|
1568 |
(1540) |
| G#/Ab |
1661.2 |
|
|
|
| A |
1760 |
(1700.4) |
(1764) |
1760 |
| A#/Bb |
1864.7 |
1831.2 |
|
|
| B |
1975.5 |
(1962) |
1960 |
(1980) |
| C (octave"7") |
2093.0 |
2092.8 |
|
|
| C# |
2217.5 |
|
(2155.1) |
2200 |
| D |
2349.3 |
|
2352 |
|
| D#/Eb |
2489.0 |
|
(2547.9) |
(2420) |
| E |
2637.0 |
|
|
2640 |
| F |
2793.8 |
|
2743.9 |
(2860) |
| F#/Gb |
2959.96 |
|
(2939.9) |
|
| G |
3135.96 |
|
3135.9 |
3080 |
| G#/Ab |
3322.4 |
|
|
(3300) |
| A |
3520 |
|
|
3520 |
| C (piano's top note)
|
4186.0 |
|
|
|
Many of these frequencies
are quite different from modern major scale values.
Willow flute scales are calculated starting with the modern frequency
value
for the fundamental (base note) of the scale.
This scale not only has skips in its lower
regions which we don't expect a scale to have, but its pitches are not
what we're used to from hearing modern instruments. In modern times we
use what's called an even tempered scale. How this came to be is well
beyond the scope of this
article, but suffice it to say that it's what modern western ears
expect to
hear. A nice, and mercifully short, explanation of the even tempered
scale
and how it differs from the willow flute's scale can be found on the
internet
at <www.sju.edu/~rhall/newton> and <www.sju.edu/
~rhall/newton/mathandmusic.pdf>. (These two articles discuss some
aspects of willow flute physics at length.) Other, more theoretical
explanations can be found in any number of books addressing the physics
of musical sound. In the region of the scale which doesn't have the
wide skips of the lowest notes, the natural willow flute scale is
similar to the major scale our ears are used to, but with a raised 4th
and a lowered 6th and 7th notes.
The fundamental is hard to get on most flutes – one must blow VERY
gently and the resulting note is extreme-ly soft. There are also notes
above the ones shown here. These get progressively closer and closer
together. They're hard to get because one must blow so hard, and it's
hard to control which note you'll end up playing. Incidentally, this is
the same scale that the munnharpe (Nor) (munngiga - Sw., mouth/jews
harp - Eng.) produces.
Try making a willow flute this winter, and have fun with it.
Note: The munnharpa’s open and closed notes are made by opening
and closing off the throat while playing. Changing one's internal mouth
shape, much as one does while whistling, does the rest.
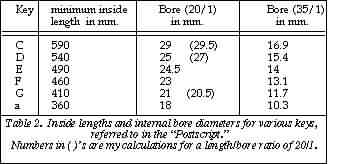
A Postscript
While researching this article, I found
a web article on making native American flutes, which are also fipple
flutes, but with finger-holes. One blows directly into the end of these
flutes. Instead of a plug which directs air at the fipple, this flute
has an internal barrier near the blowing end, creating a small chamber
with a hole in the top. The hole is away from the blowing opening, and
beside the barrier. The
air comes out this hole and strikes a plate attached to the outside of
the
flute. The plate has a channel scored into its underside to direct the
air
back down toward the fipple, and so back into the flute. This webpage
has
a list of flute lengths and internal bores for several keys. Since the
lengths
are valid for any type of flute, I'm listing that information in Table
2. These bores are a bit big, though. My willow-flute sources suggest
an inner
flute length (between the far end and the fipple) to inner diameter
ratio
of 35/1. The Indian flute author suggests a length/bore ratio of 23/1.
The values given in this table are 20/1. The bore size affects the
tonal quality of the flute, as well as ease of playing. The differing
bore sizes are most of what make the sharp-voiced willow flutes and the
mellower-voiced Indian flutes sound so dif-ferent. This web page is at:
<www.wycliffe.org/events/music/NativeAmerican.pdf>
References:
Books on the physics of musical
sound: I have several, none of which I'm fond of. There are lots of
them which cover the subject in varying detail and depth. The bare
basics are also usually
covered in introductory physics texts. They all say approximately the
same
thing, and all that I've seen are aimed at the person vitally
interested in
physics. Somewhere out there, there must be one aimed at the minimally
mathematically
inclined musician! While I did consult mine to check details for this
article,
they're pretty dry, and one is about as good as another if you just
want
basic infor-mation.
On the Internet: all in English unless otherwise noted.
Just for fun:
<www.soundwell.com/multi flute-e.htm> and associated
pages.
This group of pages wants to sell you "willow" flutes made with
flexible tubing of some type. This allows really low pitched scales and
flutes in a variety of keys. They even have one with interchangeable
tubes to allow for more flute keys. It has a nice explanation of how
they work; you could probably make one yourself from the info given
here. There are also some sound examples so you can hear what these
things sound like. The author
has a definite sense of humor, and the instruments are inherently
pretty
funny.
If you want to make a real willow flute:
<www.geocities.com/SoHo/Museum/4915/SALLOW.HTM>,
<mitglied.lycos.de/jkoeller/flute.htm>
And in Norwegian (with diagrams):
<www.disney.no/DisneyVideo/summer/poca/poca_salg.html>
Guide to building other types of flutes:
<www.wannalearn.com/Crafts_and_Hobbies/Woodworking/Building_Musical_
Instruments/Flutes/>
The physics of woodwinds:
<www.phys.unsw.edu.au/~jw/woodwind.html> The physics of
strings are on some associated pages.
The physics of willow flutes:
<www.sju.edu/~rhall/newton> &
<www.sju.edu/~rhall/newton/mathand music.pdf>
Many university pages on the physics of music come into and out of
existence with courses being taught. These pages tend to have clear and
accurate
explanations, although some of them refer the reader to the class text,
which doesn't do the non-class member much good. They're worth
investigating
if you are interested in this stuff. I've also seen good instrument
build-er’s
pages, but some of them also seem to have rather fleeting lifespans.
The
page given above under woodwind physics, from the University of New
South
Wales in Australia, has been around for at least a couple of years, so
it
seems fairly stable. §